繼魔戒 Online 之後,這是第二款MMORPG讓我如此大費周章的介紹遊戲,這次會以研發者的角度來分析遊戲。
星際大戰-舊共和國是最近出的一款MMORPG,本作有很多地方對於MMOG來說是很創新的地方,本來是打算兩篇寫完再一起發佈,不過今天......嗯......唉......嗯嗯......唉唉......所以就先發佈第一篇,明天也會上傳到公司,希望有點幫助............。
星際大戰-舊共和國-(上)-介面篇
2012年1月9日 星期一

2012年1月5日 星期四
2011年8月18日 星期四
Ogre3D v1.7 與 OpenGL ES 1.1 (2)
最近因為升級了其它的 ThirdParty 套件的版本所以 Ogre 也必須要 Rebuild, 只是 OpenGL ES 忘了當初怎麼 Build 因此又花了一些時間研究, 順便做一下筆記, 免得下次要 Rebuild Ogre 時又忘了.
Ogre 1.7.x 只支援 OpenGL ES 1.1, 所以想使用 OpenGL ES 2.0 的話則必須使用 Ogre 1.8, Ogre 1.8 官方目前還在 Debug 中, 所以只好先使用 Ogre 1.7.x + OpenGL ES 1.1 的組合, 以下將說明方法.
1. 至 PowerVR 的網站下載 OpenGL ES SDK, 要先加入會員.
2. 在 Khronos OpenGL ES 1.1 SDKs 中選擇 PC Emulation Windows 7/Vista/XP - OpenGL ES 1.1, 如果方便的話, 也可以將其它平台及版本的套件全部下載, 還有工具及說明文件也一併下載.
3. 安裝 OpenGL ES SDK, 等待安裝完成後就可以進行下一步.
4. 在其它地方中先建立一個 Dependencies 目錄, 並在此目錄下建立三個子目錄
Dependencies\Bin
Dependencies\include
Dependencies\lib
5. 打開 SDK 安裝目錄, 然後切換目錄至 Imagination Technologies\POWERVR SDK\OGLES_WINDOWS_X86EMULATION_2.08.28.0634\Builds\OGLES
將 Include 目錄下所有的檔案複製到 Dependencies\include
將 WindowsX86\Lib 目錄下所有的 .lib 檔複製到 Dependencies\lib
將 WindowsX86\Lib 目錄下所有的 .dll 檔複製到 Dependencies\bin
複製完後應該會有如下列的檔案
Dependencies\Bin
Dependencies\Bin\Debug
Dependencies\Bin\Debug\libEGL.dll
Dependencies\Bin\Debug\libgles_cm.dll
Dependencies\Bin\Release
Dependencies\Bin\Release\libEGL.dll
Dependencies\Bin\Release\libgles_cm.dll
Dependencies\include
Dependencies\include\EGL
Dependencies\include\EGL\egl.h
Dependencies\include\EGL\eglext.h
Dependencies\include\EGL\eglplatform.h
Dependencies\include\GLES
Dependencies\include\GLES\egl.h
Dependencies\include\GLES\gl.h
Dependencies\include\GLES\glext.h
Dependencies\include\GLES\glplatform.h
Dependencies\include\KHR
Dependencies\include\KHR\khrplatform.h
Dependencies\lib
Dependencies\lib\Debug
Dependencies\lib\Debug\libEGL.lib
Dependencies\lib\Debug\libgles_cm.lib
Dependencies\lib\Release
Dependencies\lib\Release\libEGL.lib
Dependencies\lib\Release\libgles_cm.lib
6. 將 Dependencies 複蓋到 Ogre 的 Dependencies 目錄
7. 編譯的時候會有 Error, 修改 Code 方法如下,
在 GLESTextureBuffer::GLESTextureBuffer 中, 將 pow(2, level) 改成 (int)pow(2.0f, level)
2011年8月11日 星期四
[筆記] 第三方程式庫 Build 方式
可能年紀大了所以有點失智, 特此筆記一下幾個比較複雜的第三方程式庫 Build 方式, 不定時更新.
========================================
BOOST
1. bootstrap.bat
2. 設定
有 STLport
a. boost_1_46_1\tools\build\v2\user-config.jam
修改 using msvc : 9.0 ; (# 號要拿掉)
b. bjam --toolset=msvc --build-type=complete stage
無 STLPort
a. boost_1_46_1\tools\build\v2\user-config.jam
修改 using msvc : 9.0 ; (# 號要拿掉)
b. bjam --toolset=msvc
========================================
JPEG
VS2008
1. nmake /f makefile.vc setup-vc6
2. Debug: nmake /f makefile.vc
Release : nmake /f makefile.vc nodebug=1
VS2010
1. nmake /f makefile.vc setup-vc10
2. Debug: nmake /f makefile.vc
Release : nmake /f makefile.vc nodebug=1
========================================
wxWidgets
D:\ThirdPartyBuild\wxWidgets-2.9.1\build\msw
nmake -f makefile.vc
nmake -f makefile.vc BUILD=release
nmake -f makefile.vc UNICODE=0
nmake -f makefile.vc UNICODE=0 BUILD=release
copy .\wxWidgets\Include\msvc\wx\setup.h .\wxWidgets\Include\wx\setup.h
========================================
BOOST
1. bootstrap.bat
2. 設定
有 STLport
a. boost_1_46_1\tools\build\v2\user-config.jam
修改 using msvc : 9.0 ; (# 號要拿掉)
b. bjam --toolset=msvc --build-type=complete stage
無 STLPort
a. boost_1_46_1\tools\build\v2\user-config.jam
修改 using msvc : 9.0 ; (# 號要拿掉)
b. bjam --toolset=msvc
========================================
JPEG
VS2008
1. nmake /f makefile.vc setup-vc6
2. Debug: nmake /f makefile.vc
Release : nmake /f makefile.vc nodebug=1
VS2010
1. nmake /f makefile.vc setup-vc10
2. Debug: nmake /f makefile.vc
Release : nmake /f makefile.vc nodebug=1
========================================
wxWidgets
D:\ThirdPartyBuild\wxWidgets-2.9.1\build\msw
nmake -f makefile.vc
nmake -f makefile.vc BUILD=release
nmake -f makefile.vc UNICODE=0
nmake -f makefile.vc UNICODE=0 BUILD=release
copy .\wxWidgets\Include\msvc\wx\setup.h .\wxWidgets\Include\wx\setup.h
2011年8月2日 星期二
原始碼排版工具 - Artistic Style
※ 今天上去看了一下發現有更新, 下載後順便把幾年寫的教學給 PO 上來, 也順手寫一下介紹.
※ 新版因為格式有變更, 所以更新參數.
Artistic Style 是什麼? Artistic Style 是一套 OpenSource 的原始碼排版工具, 它會依照你所設定的格式參數將你的原始碼做好排版的工作, 讓你的程式碼看起來整齊劃一, 當然, 如果你的程式碼亂的太誇張還是必須自行手動才行.
Artistic Style 的格式說明在官網的說明中寫的很清楚, 若很懶的看的話也可以使用我的格式來使用, 尤於 Artistic Style 是屬於命令列的工具, 所以在 Visual Studio 中想使用它的話必須透過一些方法來達成, 方法及我使用的格式如下:
2. 開啟 Visual Studio 裡的 "外部工具"


※ 新版因為格式有變更, 所以更新參數.
Artistic Style 是什麼? Artistic Style 是一套 OpenSource 的原始碼排版工具, 它會依照你所設定的格式參數將你的原始碼做好排版的工作, 讓你的程式碼看起來整齊劃一, 當然, 如果你的程式碼亂的太誇張還是必須自行手動才行.
Artistic Style 的格式說明在官網的說明中寫的很清楚, 若很懶的看的話也可以使用我的格式來使用, 尤於 Artistic Style 是屬於命令列的工具, 所以在 Visual Studio 中想使用它的話必須透過一些方法來達成, 方法及我使用的格式如下:
1. 從官網下載需要的版本, 並解開壓縮檔放置在某個目錄下.

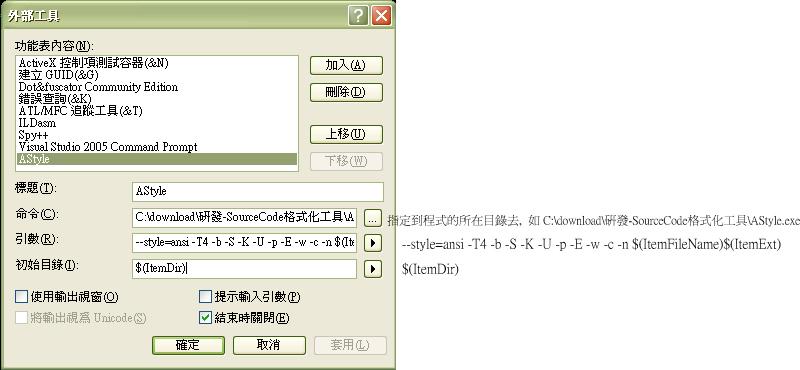
3. 加入一個新的, 並如下圖所示設定, 參數請注意大小寫 (或將下方剪下然後貼上)
標題:Artistic Style 在 Visual Studio 中的按鈕名稱, 可以取 AStyle 就好.
命令:指向 Artistic Style 的執行檔.
標題:Artistic Style 在 Visual Studio 中的按鈕名稱, 可以取 AStyle 就好.
命令:指向 Artistic Style 的執行檔.
引數:即格式, 我使用的格式如下, $(ItemFileName)$(ItemExt) 表示目前作用的完整檔名
(新版本) --style=ansi -T4 -b -S -K -w -Y -M -m -p -H -y -c -E -n $(ItemFileName)$(ItemExt)
初始目錄:這個設定成目前作用的檔案目錄 $(ItemDir)(新版本) --style=ansi -T4 -b -S -K -w -Y -M -m -p -H -y -c -E -n $(ItemFileName)$(ItemExt)
4. 先在一般的工具列上按下滑鼠右鍵, 然後選則 “自訂”
5. 當自訂的視窗出現後, 在開啟工具選單, 將外部命令N (N 的順序如步驟 2 所示, 請自行由上往下數一數) 拖曳至其它工具列即可, 然後離開自訂視窗後, 外部命令N 的按鈕就會變成 AStyle 按鈕.

6. 開啟任意檔案 (如.cpp .h), 按下工具列上 AStyle的按鈕, 程式碼即會依照我們指定的參數排版.
訂閱:
文章 (Atom)